Flexible storage with LVM
I recently found myself in a position where my disk drive usage did not match the relative capacities of the drives I was using.
Due to increasing size of my dropbox directory the boot drive (/dev/sda) was rapidly running out of space whilst the secondary drive (/dev/sdb) was barely being used.
What I needed was a seamless way to extend the capacity of my boot drive without destroying the data, luckily Ubuntu has been installing boot drives under Logical Volume Management (LVM) for some time now as a preferred option.
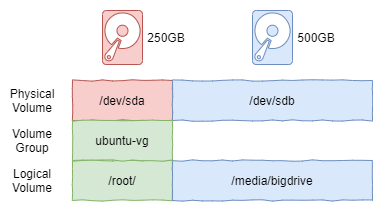
My current hard drive layout consists of:
- the
/dev/sdaphysical volume/drive presenting as/root/logically under theubuntu-vgvolume group - the
/dev/sdbphysical volume/drive presenting as/media/bigdrivelogically but is outside of volume group management resulting in a 1-to-1 mapping of physical drive to logical drive reducing its flexibility.

Resizing volumes with Logical Volume Management (LVM)
Steps required:
- Register the
bigdrivedisk as a Physical Volume (pv) - Extend the Volume Group (vg) to include the new Physical Volume
- Create a new Logical Volume (lv) that maps to the size of the Physical Volume
- Add a filesystem to the Logical Volume, make it mountable after system restarts
- Resize the new
bigdriveLogical Volume to reduce its size and free up space for expansion - Resize the
rootvolume to increase its size to use the free space from the previous step
Creating the physical volume
First create the physical volume, this adds the required LVM headers to the drive we want to add to our volume-group:
sudo pvcreate /dev/sda1
WARNING: ext4 signature detected on /dev/sda1 at offset 1080. Wipe it? [y/n]: y
  Wiping ext4 signature on /dev/sda1.
  Physical volume "/dev/sda1" successfully created
Warning these headers are added to the beginning of the drive and will effectively wipe the content of your disk.
Back up any content on your disk first!
In my case as the disk was seriously under-utilised backing it up didn’t take long.
We can now see the physical volume is identified by LVM via the pvdisplay command:
  /$ sudo pvdisplay
  --- Physical volume ---
  PV Name               /dev/sda1
  VG Name               ubuntu-vg
  PV Size               232.41 GiB / not usable 2.00 MiB
  Allocatable           yes
  PE Size               4.00 MiB
  Total PE              59496
  Free PE               5759
  Allocated PE          53737
  PV UUID               1196d8-6ec4-c349-638e-685a-a1c5-997e51

  "/dev/sdb1" is a new physical volume of "931.51 GiB"
  --- NEW Physical volume ---
  PV Name               /dev/sdb1
  VG Name
  PV Size               931.51 GiB
  Allocatable           NO
  PE Size               0
  Total PE              0
  Free PE               0
  Allocated PE          0
  PV UUID               612ffc-1e4a-8d4a-738f-5d68-438b-8da854
Adding a new disk to the volume group
Now extend our volume group ubuntu-vg to include our initialised physical volume sda1
sudo vgextend ubuntu-vg /dev/sda1
Using pvdisplay we can now see that sda1 has been attached to the ubuntu-vg volume group and is now marked as Allocatable yes.
  /$ sudo pvdisplay
  --- Physical volume ---
  PV Name               /dev/sda1
  VG Name               ubuntu-vg
  PV Size               232.41 GiB / not usable 2.00 MiB
  Allocatable           yes
  PE Size               4.00 MiB
  Total PE              59496
  Free PE               5759
  Allocated PE          53737
  PV UUID               1196d8-6ec4-c349-638e-685a-a1c5-997e51

  --- Physical volume ---
  PV Name               /dev/sdb1
  VG Name               ubuntu-vg
  PV Size               931.51 GiB / not usable 4.00 MiB
  Allocatable           yes
  PE Size               4.00 MiB
  Total PE              238466
  Free PE               238466
  Allocated PE          0
  PV UUID               612ffc-1e4a-8d4a-738f-5d68-438b-8da854
Create the logical volume
Now in order to access our disk and put data on it we need to expose it as a logical volume.
In this case I want to use the whole physical disk, thanks to the Linux Documentation Project’s LVM-HOWTO I constructed the following command:
sudo lvcreate -l 100%FREE -n bigdrive ubuntu-vg /dev/sdb1
  Logical volume "bigdrive" created.
Now inspecting both the volume group device listing /dev/ubuntu-vg/ and the mapper device listing /dev/mapper/ we can see the new logical volume is present and associated with the volume group ubuntu-vg.
/$ ls -l /dev/ubuntu-vg/
total 0
lrwxrwxrwx 1 root root 7 Nov 10 17:55 bigdrive -> ../dm-2
lrwxrwxrwx 1 root root 7 Sep 24 21:17 root -> ../dm-0
lrwxrwxrwx 1 root root 7 Sep 24 21:17 swap_1 -> ../dm-1

/$ ls -l /dev/mapper/
total 0
crw------- 1 root root 10, 236 Sep 24 21:17 control
lrwxrwxrwx 1 root root       7 Nov 10 17:55 ubuntu--vg-bigdrive -> ../dm-2
lrwxrwxrwx 1 root root       7 Sep 24 21:17 ubuntu--vg-root -> ../dm-0
lrwxrwxrwx 1 root root       7 Sep 24 21:17 ubuntu--vg-swap_1 -> ../dm-1
Standard drive preparation
Next format the volume so that there is a filesystem present to allow data to be written later:
sudo mkfs.ext4 /dev/ubuntu-vg/bigdrive
Mount the volume so we can read and write data from it:
sudo mkdir /media/bigdrive/
sudo mount /dev/ubuntu-vg/bigdrive /media/bigdrive/
Make the mount accessible from boot / restarts by adding (hence the -a switch to append) the mounting to the fstab:
sudo echo "/dev/mapper/ubuntu--vg-bigdrive /media/bigdrive ext4 defaults 0 0" | sudo tee -a /etc/fstab
Resizing the volumes
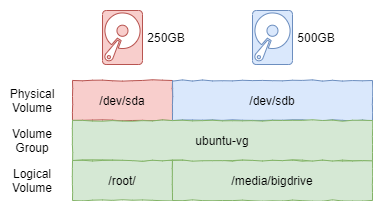
Our changes so far have resulted in the following interim layout where both drives each have a corresponding phyiscal volume that are within the volume group.
There are logical volumes matching the size of each physical volume, e.g. 250GB for root and 1GB for bigdrive.

Next up we need to do our resizing of our logical volumes to differ from the sizes of the physical volumes:
- Resize the
bigdrivevolume down by 2GB, adjusting the filesystem at the same time, note that you’ll need the free space on the volume first or else this operation will fail or delete your content. If the partition/drive has content on I’d advise backing it up first before reducing it.sudo lvresize --resizefs -L -250G /dev/ubuntu-vg/bigdriveto resize a logical volume the –resizefs parameter is very important as this also resizes the filesystem before resizing the volume preventing data loss issues.
- Resize the
rootvolume up by 2GB to use the space freed up by step 1.sudo lvresize --resizefs -L +250GB /dev/ubuntu-vg/root
The final state
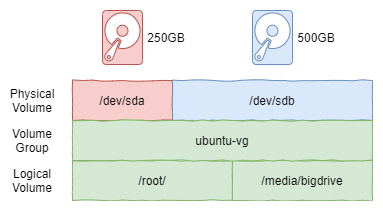
As we can now see the root logical volume has increased in size beyond the size of the physical volume it started out being mapped to and bigdrive has been reduced correspondingly.

Now I have the ability to resize my logical volumes as long as they are managed under the volume group.
No longer does the physical volume size (the disk size) predicate my volume size.
I am free to rearrange my volume sizes to fit my use cases :-).